• 3/31/23 9:05 am
scheduled
- 10.2k views • 25 today
- 3
- 2
58
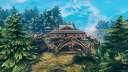
Say goodbye to starting from scratch every time you join a dedicated server, and hello to a world where your friends can use your base while you are gone!
Of course, uploading your world onto a dedicated server is easier said than done. You'll need to navigate a series of confusing menus, decipher some cryptic error messages, and sacrifice a 2-star dvergr support mage to the gods.
First things first, make sure you have a Valheim world that you want to upload. This should be a world with a specific seed which you've chosen. The world might also include some structures, portals, or storylines / quests that you have added. You can browse a seed that you like using the valheim-map.world tool. I personally love these seeds..
gnarl = trader and swamp with iron on starting continent
dog = Perfect starting spawn for a central dock base with mountains and meadows
huge = large starting continent with swamp and trader
light = seed with swamp on starting continent
jiggle = lots of mountains near start
hug = lots of mountains near start
partzer12 = lots of mountains near start
ringoswam = lots of plains close to start (at least as close as the plains can get)
riito = my favorite seed, multiple continents that stretch over half the map
After you pick your seed or use the world file you already used, the next step is to choose a dedicated server provider. There are plenty of options out there, ranging from big-name companies to small independent hosts. Do your research and choose one that fits your needs and budget. I personally am sponsored by ZAP servers and also use them to play valheim myself. Valheim servers usually cost $15 - $20 per month to maintain.
Once you've chosen a provider, it's time to upload your world. This is where things can get a bit tricky. You'll need to find the right files on your computer and point the server at the right file.
First, let's locate the files of your valheim world. Valheim saves the world into two files, a .db file and a .fwl file. If the name of your world is NewQuest, then the files you are looking for are NewQuest.db and Newquest.fwl
These files are not located in your base valheim installation. Instead, they are stored in user app data. This is usually a hidden folder so you'll have to navigate to it by typing \AppData when you are in your main user folder
From there, AppData>LocalLow>IronGate>Valheim
Inside this valhein folder, you will find your character saves and world saves. Worlds_local is the folder that matters. Look for your world of choice and copy the .fwl and .db files to your desktop. Don't worry too much about all the other files, they are just automatic backups of your world.
Now it is necessary to turn off your dedicated server.
Next, you need to login to your dedicated server file hierarchy. This is usually accomplished via FTP programs such as FileZilla. When you rent a dedicated server they will assign you some information so you can login to the server to access the files. Look on your server management page for the FTP login credentials.
Use FileZilla to connect to your server. You'll see that the file hierarchy is similar to what you looked at earlier. Look for the worlds_local folder and paste your world files there. Wait for the files to finish uploading and then close FileZilla.
Before you turn the server on you need to tell it which world file to look at. This is usually done in the server management section shown in the video. After you specify the exact name of the files you uploaded to worlds_local, you can turn your server back on. Assuming everything went correctly, if you log in to the server it will be the world you created.
Who knows, maybe someday you'll be the proud owner of the most popular Valheim server in the land.
Have fun!
- Jack
More like this
 How to Parse a Valheim Server Log and Locate Player ActivityTutorial Article
 JP Valheim
•4/7/23 9:40
11.6kx 121
JP Valheim
•4/7/23 9:40
11.6kx 121 How to Make a Public Valheim Server Work for Xbox and PC PlayersTutorial ArticleJP Valheim
•4/21/23 8:00
4.5kx 121
How to Make a Public Valheim Server Work for Xbox and PC PlayersTutorial ArticleJP Valheim
•4/21/23 8:00
4.5kx 121 How to Remove or Adjust Deathsquito on a Valheim ServerTutorial ArticleJP Valheim
•7/30/24 10:28
1.3kx 13
How to Remove or Adjust Deathsquito on a Valheim ServerTutorial ArticleJP Valheim
•7/30/24 10:28
1.3kx 13 How to Create Explosive Wards on your Valheim EWP ServerTutorial ArticleJP Valheim
•7/11/24 7:07
1.2kx 13
How to Create Explosive Wards on your Valheim EWP ServerTutorial ArticleJP Valheim
•7/11/24 7:07
1.2kx 13 How to Find Valheim's Multiplayer Sweetspot and Get Better Server PerformanceTutorial ArticleJP Valheim
•6/27/26 9:28
548x 12
How to Find Valheim's Multiplayer Sweetspot and Get Better Server PerformanceTutorial ArticleJP Valheim
•6/27/26 9:28
548x 12
1219
6


 User13280G
 Lou De Witte
 SharpWolfclaw
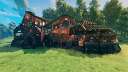
 Fluffy-n-Dana
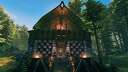
 Hermod

Have something to say?